Exporting FBX from Blender to a game engine should be straightforward. It is not. Blender uses a Z-up coordinate system. Unity and Unreal use Y-up. Blender's default unit is 1 metre per Blender Unit. Unreal uses centimetres. There is a rotation difference in how bones are oriented. All of this means a clean FBX export from Blender can arrive in a game engine looking rotated, scaled wrong, or with broken animations — if you do not know the right settings.
This article covers the exact export settings that fix these problems for Unity and Unreal Engine, the common errors and what causes them, and a few habits that keep your pipeline clean.
Get Your FBX Export Settings Right
Export Each handles all of this automatically. One click exports every object or collection to its own file with consistent settings every time.
Small Habits That Speed Up Your Workflow
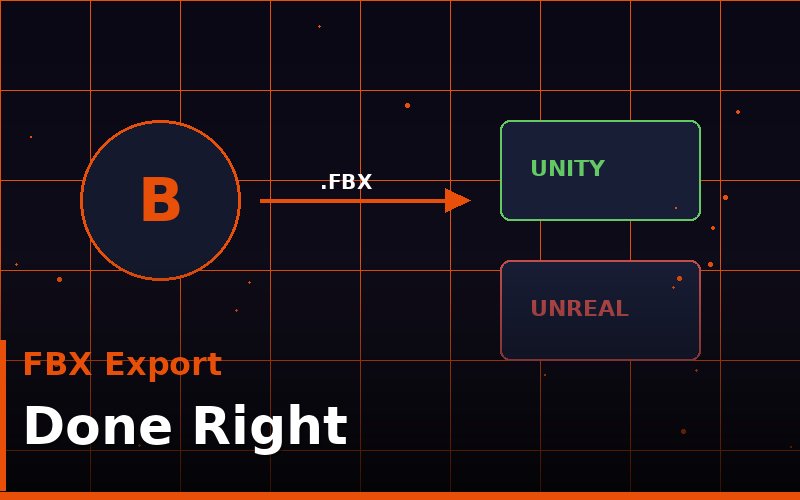
FBX Export Settings for Unity
In Blender, go to File > Export > FBX (.fbx). In the export panel on the right, set the following:
Transform tab: Scale: 1.0 — Forward: -Z Forward — Up: Y Up — Apply Unit: checked — Apply Scalings: FBX All
The most important setting is Apply Scalings: FBX All. This bakes the Blender unit scale into the FBX file so Unity reads it at the correct size. Without this, your character that is 1.75 BU tall in Blender might arrive at 175 units in Unity, which is enormous.
In Unity after import, set the Scale Factor to 1 in the model import settings. If you used Apply Scalings: FBX All in Blender, this should already be correct. Check your mesh in the scene — a 1.75m character should stand roughly the same height as a Unity default capsule (also 1.75m).
FBX Export Settings for Unreal Engine
Unreal uses centimetres, not metres. 1 Unreal unit = 1 cm. So a 1.75m character in Blender should arrive as 175 Unreal units tall. To make this work without scaling headaches, set your Blender scene unit scale to 0.01 before you model (Properties > Scene > Units > Unit Scale: 0.01). This way 1 BU = 1 cm and your measurements match Unreal directly.
For the FBX export: Forward: -Z Forward — Up: Y Up — Apply Scalings: FBX All — Apply Unit: checked. In Unreal's import dialog, set Import Uniform Scale to 1.0. Your mesh should arrive at the correct size without any additional scaling in the engine.
For skeletal meshes and animations, also enable Bake Animation in the FBX export panel if you are exporting armature animations. Leave Simplify at 1.0 unless you specifically need to reduce keyframe count.
Common FBX Export Errors and How to Fix Them
Object arrives rotated 90 degrees: You used the wrong Forward/Up axis. For both Unity and Unreal use -Z Forward, Y Up. If the object is already imported wrong, fix it in Blender's export settings and re-export rather than correcting in the engine.
Object is 100x too large or too small: Apply Scalings was not set to FBX All, or Apply Unit was unchecked. Both need to be active for correct scale. Also check that you applied transforms (Ctrl+A > All Transforms) in Blender before exporting.
Bones are twisted or animation looks broken: Blender's bone roll differs from what most engines expect. Make sure your armature transforms are applied and that you are using the correct rest pose. Exporting from Pose Mode instead of Object Mode can also cause this.
Materials are missing after import: FBX exports material slots and names but not textures. You need to either embed textures (check Embed Textures in the FBX export panel) or manually assign them in the engine after import.
Frequently Asked Questions
Should I export FBX or GLTF for game engines?
FBX is more universally supported, especially for Unity and Unreal. GLTF 2.0 is better supported in Godot and is growing in Unity. For Unreal, FBX is still the standard for skeletal meshes and animations.
Why is my mesh black after import into Unity?
This is usually a normal direction issue. In Blender, check your face normals (Overlay menu > Face Orientation — blue is correct, red is flipped). Flip reversed normals in Edit Mode with Alt+N. Re-export after fixing.
Do I need to triangulate before export?
Not always — most engines triangulate on import. However for predictable results, especially with complex geometry, it is good practice to triangulate (Ctrl+T in Edit Mode) before export. This prevents the engine's auto-triangulation from creating unexpected shading artefacts.
If you are working in Blender and exporting is slowing you down, see how to batch export multiple objects or 5 faster ways to export your assets., check out Export Each. One click exports every object or collection to its own file automatically.

